|
|
Bmw F25 Software Update Jun 2026This guide covers preparing for, obtaining, and installing software updates on a BMW F25 (X3, 2010–2017 platform). It includes the types of updates, where to get them, safe procedures, required tools, step‑by‑step instructions for common methods (remote/FSC/USB/ISTA), verification, and troubleshooting. For owners of the BMW X3 (F25), keeping your vehicle's software up to date is one of the most rewarding yet often overlooked aspects of modern car ownership. Whether you're experiencing glitchy iDrive performance, outdated navigation maps, or simply want to unlock hidden features, a software update can breathe new life into your SUV. This comprehensive guide will walk you through everything you need to know about BMW F25 software updates—from understanding the benefits and identifying your iDrive system to performing DIY updates and troubleshooting common issues. Let's dive in. bmw f25 software update Follow the prompts. The process usually takes 5–10 minutes. Other Types of Updates This guide covers preparing for, obtaining, and installing This updates the Bluetooth stack, telematics, and audio codecs. Follow the prompts Keeping maps current ensures accurate routing and updated Points of Interest (POIs). HOW TO: BMW 2021/2022 Map Update Process Explained : Go into your phone's settings, choose "Forget this Device" for your BMW, and delete your phone from the iDrive menu. Restart both the phone and the car, then pair them fresh. Turn on your vehicle's ignition (engine off is fine, but ensure your battery is healthy). |
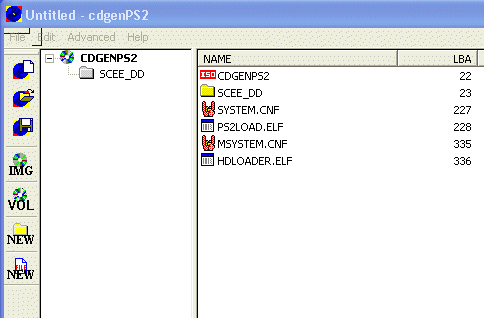
Bmw F25 Software Update Jun 2026psload.rar (download this)Needed: PS2LOAD.ELF (included in psload.rar) HDLOADERv0.8b.ELF (use whatever version you want to use) SCEE_DD folder (included in psload.rar) HD Loader retail disc (or HDAdvance retail disc) Winhiip 1.7.6 An IDE HDD for PS2 (internal ) A Network Adapter A PS2 CDGEN v3.0 Create a new folder on your desktop and extract the psload.rar contents into it. Add your HD Loader.elf to the folder and rename it to HDLOADER.ELF Prepare files: Right-click in folder window and mouse-over 'New', select 'text document' Copy & Paste this:
Repeat above step for another text document Copy & Paste this:
Now save this document as SYSTEM.CNF Create ISO: Open cdgenPS2 and drag the files in this order:
 Multi-loader [Optional] You can have more than HDLoader to select from by adding the elfs to your cdgen compilation and adding the correct entries to the MSYSTEM.CNF Example MSYSTEM.CNF:
\title name\cdrom0:\app.elf ADD THE ELFs after MSYSTEM.CNF in cdgenPS2 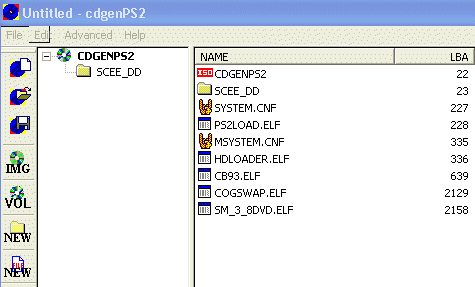 Save Click VOL to rename "CDGENPS2" Optional- its not necessary to do this. Click IMG to save as an .iso ( this name will show in the HDLoader Game List) 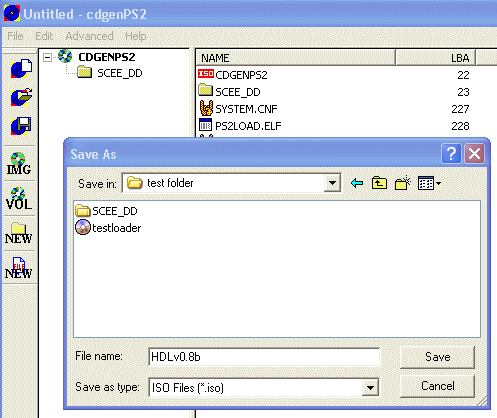 Install the ISO to the PS2's HDD Open Winhiip and install the iso as you would a ps2 game with your ps2's hdd connected to the PC. menu name will appear in the game list boot file is SCES_666.66 by default (dont change this! ) 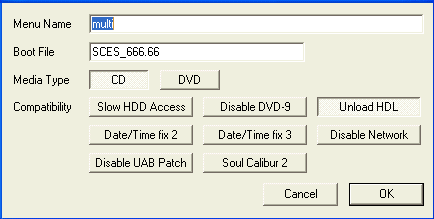 Enable Mode3 (Unload HDL) Now get the hdd in your PS2 and you can select this from your retail HD Loader/HD Advance disc from the game list and press X For just a single app: At the PS2Loader screen, just press X twice Multi-loader : At this screen "Change the disc And press X to play", just press X Example Menu screen: HDLoader CodeBreakerv9.3 COGSWAP SwapMagicv3.8 Now you just select a title and press X to load it |
|
|